How to Install Ubuntu 22.04 LTS Server on a Raspberry Pi
Let’s just jump straight into it. You’ll need:
- A microSD card (4GB minimum, 8GB recommended)
- A computer with a microSD card drive, a microSD USB card reader or something similar
When your treasure hunt is over, and you’ve collected the two items above, continue with the following:
- Install Raspberry Pi Imager. Exactly how this is done depends on the operating system you’re running on the computer you’re using. If you, like me, enjoy the marvelous Manjaro Linux distribution, you can search for
rpi-imagerin the Add/Remove Software utility. - Launch the Raspberry Pi Imager.
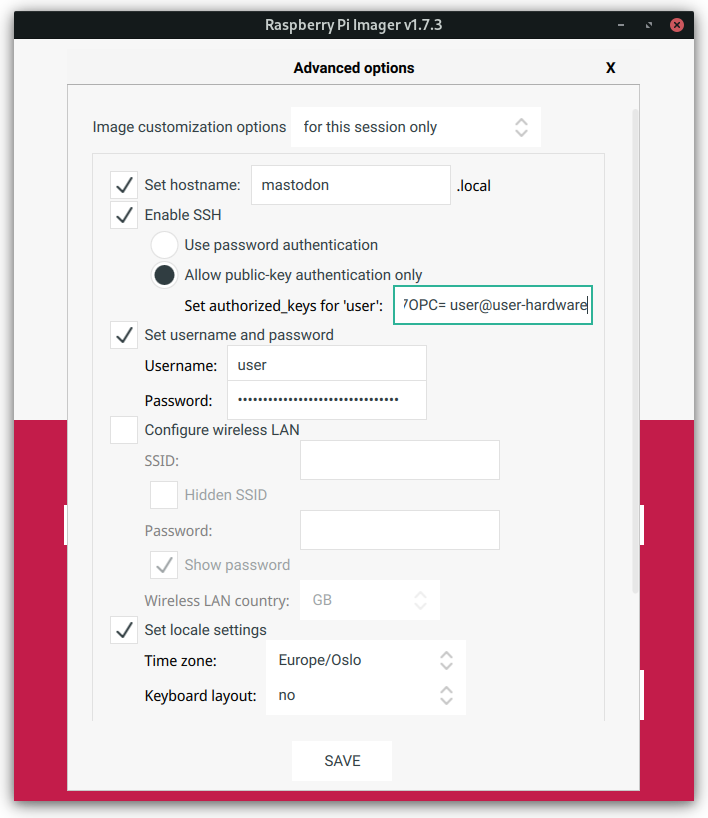
- Click the
CHOOSE OSbutton, and find Ubuntu Server 22.04.1 LTS (64-bit). Select a newer version of 22.04 if it’s available when you’re reading this. - Insert the microSD card in your computer or microSD USB card reader and make sure you’re computer finds it.
- Click the
CHOOSE STORAGEbutton, and select the microSD card from the menu. Make sure you select the correct microSD card as all the contents on the card will be deleted during the installation process. - Click the gear icon in the bottom right corner to open the advanced options screen.
- How you choose to set configure the advanced options depends on your needs. In my case I’m planning to use the Pi as a Mastodon instance that will be connected to the internet via my LAN. If you plan to use your Pi as a headless server, i.e. without connecting it to a monitor, you’ll have to enable SSH to be able to connect to it. Here’s my configuration as an example:
- Click the
Savebutton in the advanced options window. - Click the
Writebutton and then theYesbutton to confirm that you want to continue.
Writing everything to the microSD card will take some time depending on how fast the card and the reader is. Sit back and relax. There’s no need to check your social media accounts or the news. Just chill and think about your day. It was pretty good, wasn’t it?
Eventually, the Raspberry Pi Imager is done writing and verifying. Remove the microSD card, insert it into your Raspberry Pi, connect it to a power source, and off you go!
Optional: Assigning a static IPv4 address & turning off IPv6 on the LAN
This might not be applicable to you, but since I plan to use my Pi as a Mastodon instance, I want it to have a static IPv4 address to make it possible to configure the necessary firewall rules. I also want to turn off IPv6 on my LAN because keeping everything in the IPv4 address space is just easier than adding IPv6 to the mix. During the Ubuntu installation we did with the Raspberry Pi Imager, you probably noticed that it wasn’t possible to configure any of that during the installation process, so we’ll have to do it now.
When your Pi booted up the first time, it got a dynamic IPv4 address from the router it’s connected to. To find that IP, you have to log in to your router and look around for DHCP leases, and see if you can find the IP address of a connection with the host name ubuntu1.
When you’ve located the IP address, connect to it with SSH, ssh username@ip-address, where username is the username you configured during the installation process, and ip-address is the Pi’s IP address assigned by your router.
Then, on the Raspberry Pi, open the network configuration file.
sudo vim /etc/netplan/50-cloud-init.yaml
You’ll find an example configuration below. If you’re connecting through a wireless connection, the name of the network interface is different, but the configuration values should still be applicable. Change the values as you see fit:
network:
  ethernets:
    eth0:
      addresses:
      - 192.168.1.98/24 # The static IP
      dhcp4: false
      link-local:
      - ipv4 # Only use IPv4 for link-local addressing
      nameservers:
        addresses:
        - 1.1.1.1 # Cloudflare DNS server
        - 8.8.8.8 # Google DNS server
      optional: true
      routes:
      - to: default
        via: 192.168.1.1 # The IP of your router
  version: 2
When you’re done, type :, then wq and then press enter to save and exit.
Finally, activate the new interface settings.
sudo netplan apply
After a short while, you should see the terminal prompt again. If everything fails, and you’re not able to connect to the Pi, you can simply reinstall Ubuntu following the guide.
Now give someone important in your life a hug 🧡
For some reason it doesn’t look like the hostname you configured during the installation process is being broadcasted. ↩︎
Feedback
This post has no feedback yet.
Do you have any thoughts you want to share? A question, maybe? Or is something in this post just plainly wrong? Then please send an e-mail to vegard at vegard dot net with your input. You can also use any of the other points of contact listed on the About page.
